The CHAMP |Camera Controller is a hardware device for controlling your Cameras from outside the CHAMP software. It comes pre-configured to work with your cameras right out-of-the-box, so no setup is required.
SETUP
Simply plug the included Ethernet cable into an available Ethernet port on the back your CHAMP |Power hardware. This will provide both power and data to the |Camera Controller.
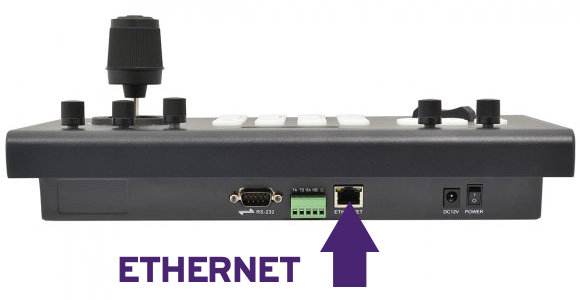
If you don’t have more than one Camera, then you may not have the CHAMP |Power hardware. If that is the case, simply plug in the power adapter included in the box.
Selecting Cameras
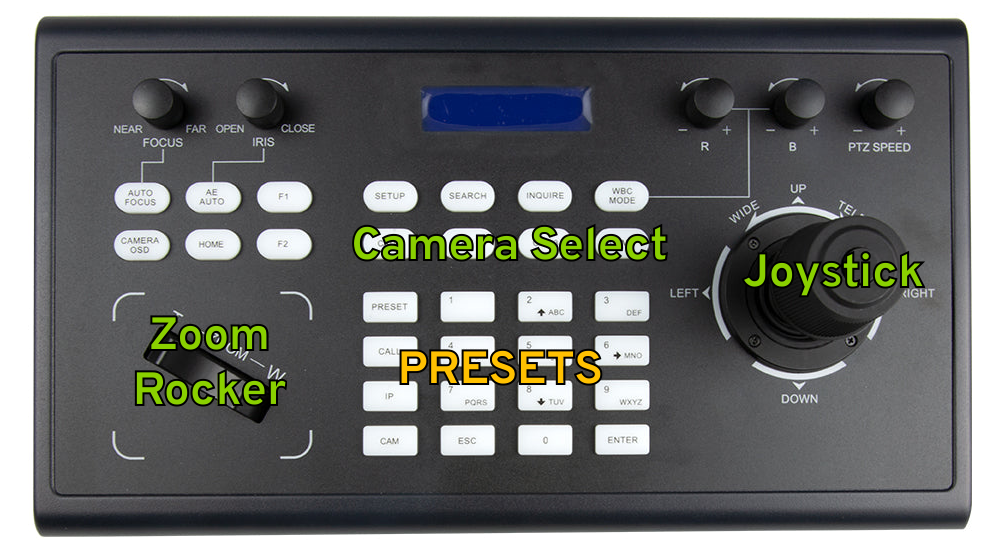
Camera Select
To select a camera, simply select the “CAM” button from the second row. “CAM 1” is your first camera, “CAM2” your second and so on. Once a camera is selected, then you can make adjustments using the following controls.
Joystick
- Moving the joystick up, down, left, or right will change the camera angle
- Rotating the joystick to the left will zoom out
- Rotating the joystick to the right will zoom in
- The top button with lock and unlock the controller
Zoom Rocker
Rocking left will zoom in and right will zoom out. This can be done in conjunction with Joystick.
Working With Presets
Creating A Preset
- Press the “Preset” button next to the numeric keypad
- Press the number of the preset you wish to save to your Camera
Note, this will overwrite any presets stored in the CHAMP Studio Controller - Press the “Enter” key located on the lower right of the numeric keypad
Note: You can have up to 250 presets stored per camera
Selecting A Preset
- Press the “Call” button next to the numeric pad
- Press the number of the preset you will to use
- Press the “Enter” key to activate the preset
Other Numeric Keys
- IP – this allows you to manually add additional cameras to control
- CAM – this allows you to select cameras beyond the 4 “CAM” buttons located above the numeric keypad. Helpful if you have 5 or more cameras
Advanced Controls
The following are more advanced controls with a breakdown on what their function, if any, is.
Dials
- FOCUS – Zoom controls, similar to the Rocker and Joystick. The “AUTO FOCUS” button below this control will switch back to automatic
- IRIS – Open and close the iris of the camera. The “AE AUTO” button below this control will switch back to automatic
- PTZ SPEED – Changes the speed of the controls on the Joystick
- R – Red Balance (DISABLED)
- B – Blue balance. (DISABLED)
Buttons
- CAMERA OSD – Unused
- HOME – Resets the selected camera to the default position when a camera is booted
- F1 & F2 – Function keys (DISABLED)
- SETUP – Access to all settings and manual setup options of the controller itself
- SEARCH – Scans the network to locate camera (DISABLED)
- INQUIRE – Displays camera ID and IP Address of cameras (joystick controlled)